In this section we feature different kinds of joinery that we use in our shop prints, our timber frame house plans, and in every timber frame that we build.
We enjoy these old-time methods of connecting timbers, and find that many of our timber frame clients are intrigued by them too.
Simple mortise & tenon
This is the most basic, and likely the first, closed mortise connection. A version of this joint in stone and without a peg can be seen in Stonehenge. Beyond a doubt, it is the best connection for a vertical post to support a horizontal beam. A timber frame for an average house, 1400 -1800 sq ft, would typically have 18–25 of these joints.

Shouldered mortise and tenon joint
Below right: Beveled — An attractive and efficient joint that can be used on the main posts and elsewhere throughout the frame.
Below left: Square — This joint is slightly stronger in that it can resist upwards cantilever type thrust sometimes created by a knee brace between the joint and a strong downwards force. In both versions of this joint, the shoulder takes the lion’s share of the weight, and the pegged tenon’s main job is to hold the girt in place.

Main post/connecting girt connection with knee brace
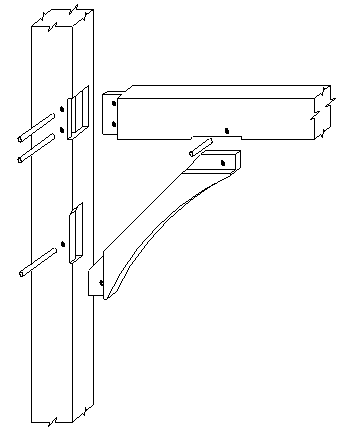
These connections would typically occur on all main posts. The knee braces are better used in opposing pairs as they are much stronger in compression than in tension. Arranging them in pairs ensures that one of them will always be in compression regardless of the direction of the force applied. Here is a diagram of a connecting girt/post connection with knee brace:
Principal Purlin / Queen Post / Rafter connection

Scarf joint
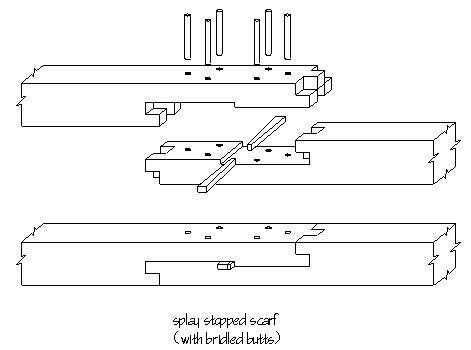
Above, diagram of a splay stopped scarf joint with bridled butts. Below, the same scarf joint on the bench:
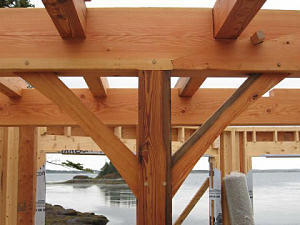
Finally, the scarf joint in situ, placed over a knee brace (left), and another, shaped differently:

An 8-ft gable dormer
If a timberframe is to have dormers, we feel that they should be framed with timber, not “left for the carpenters” to fill in . The dormers may cost a little more initially, but they can be sheathed in quickly and easily, without the head scratching involved in trying to form a valley where there is nothing to work with.
We make our valleys with a “backing cut”, the “V”ed out section that forms the intersection of the main roof and the dormer roof. This makes it very straightforward for the carpenters to sheath, insulate, and shingle the dormer.


Prefitting a hip dormer


A 17 ft. dormer


A mortise to house two rafter peaks
This is a mortise to house two 8×12 hip rafter peaks.


Interested in getting up close to a timber frame? Check out the Zoomers page.
Free Download
Timber Framing Tips and Tricks by veteran timber framer Forrest Rand.
Eight illustrated pages packed with valuable instructions, from getting the right tools to mapping irregular timbers.
We’ll also subscribe you to our occasional Timber Frame Newsletter.
Timber Frame Shop Prints
For those who want to build their own timber frame, our shop prints include a timber list, elevations, floor and roof framing plans, bent plans, enclosure details, joinery and peg details and more. Printed on easy-to-handle 11 x 17″ paper, or order the digital version to print yourself.